
How do I do this, you ask? It's easy. All you have to do is download a freeware sound editor called Audacity online, and you are well-equipped for the task. But you've only been shown the door and walked through it. The question is, how do you make yourself at home with this intimidating program?
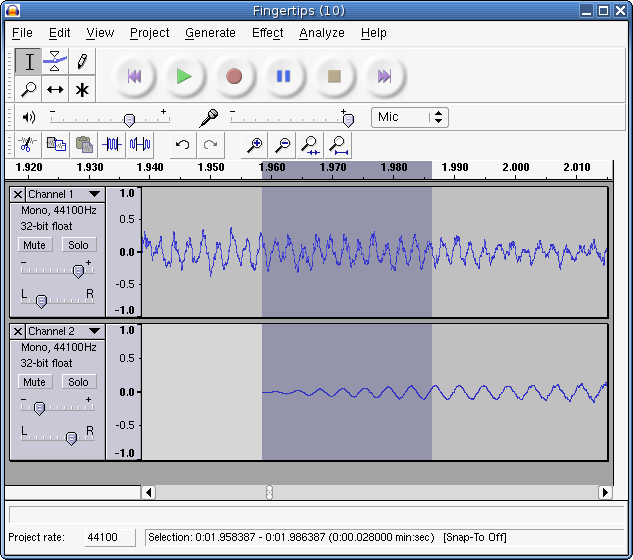
The first thing you'll want to do when opening the program is to select an mp3 file of your choosing to edit using Audacity. Upon selecting it, the following image will give you a basic rundown of what the Audacity app should look like upon running the program:

And now comes the fun part... tampering with your audio file and extending it further. But first, you'll want to familiarize yourself with the basic controls, or rather, the ones you'll be using often.

If you're going with the intention of looping your track seamlessly for a set amount of minutes, be sure to listen and listen well to the song while paying attention to the marker. It's up to you and your good ear to judge where you wish to start the loop point and end it. When you found the points you wish to loop, click the timeline of the project, click the end of the loop point, and drag to the starting loop point of the timeline. The highlighted loop point of the track should be a transparent gray, looking like this:
Now comes the most painstaking part of the project... making the loop sound as seamless as possible. If you don't get it right the first couple of times, that's absolutely fine. God knows when I first took on my batch of tracks for Ronin Warriors, I was hella frustrated when the loops didn't sound right.
NOTE: Remember that EVERY TIME you wish to use the editing tools, make sure you press "Stop" on the track, otherwise the editing tools will not work.
Step 1: To be on the safe side, edit the loop so that it repeats once. To execute this editing technique, make sure you pressed "Stop" first to activate the editing tools. After you do this, click on "Effect" from the top menu, then select "Repeat". You will be prompted to type in how many times you wish to repeat the loop. Set the number of times to "1" for a quick test run.
Step 1A: If the newly edited loop point still doesn't sound right, do not panic. Simply go to "Edit" on the top menu and select "Undo Repeat". The points where you selected the loop points previously should remain intact. And now this is where the "Zoom" options come into play.
Step 1B: To get better accuracy on your looping points, click the "Zoom In" icon to get a better fix on the beat in which you wish to edit, then using the cursor, click on each end of the highlighted area and drag it to the more accurate looping points. When you're finished, go to "Effect", select Repeat, set the number of times to "1", and listen to the looping point again. Please note that it may take a couple of tries and more zooming for some songs you may wish to edit, so be patient and don't get frustrated.
Step 2: Once you're satisfied with how the looping point sounds, go to "Edit", select "Undo Repeat" once more, Click "Effect", go to the "Repeat" option, and set the number of times to whatever closely caps the number of minutes you wish the looped track to be.
Step 3: Now you're ready to create a new customized, extended loop of your favorite music track. To complete the process and convert your work into an MP3 format, select "File", then go to "Export". From there, all you have to do is confirm the conversion, and the new MP3 will appear in the "Audacity" folder under "Program Files".
Now this is just making the MP3 alone. What if you wish to share your project on Youtube for others to listen to? Depending on your computer and available software, it may take a while to convert, or it could take a matter of minutes. I'm not exactly using a high-end computer, so I used the basic Windows Movie Maker. Some of you use Sony Vegas, so if that works for you, by all means, use that.
Making the video isn't that hard by comparison. Simply insert the MP3 to your video editing project, and insert the image file you feel is appropriate for the track.
*For Windows Movie Maker, all you have to do is make sure you drag the image file to the equal length of the track itself in order for the video to be saved.*
Once the video has been converted, go to YouTube. It is highly recommended you sign up for a YT account, because it's the only way you can upload your videos on your account (duh!). The uploading shouldn't take too long by comparison, maybe 2-3 minutes tops. From there, you can put in the title, description, and all that jazz. And if you have a playlist in mind, add that uploaded video to the playlists you have (or are about to create as you upload).
One final note: Some videos you upload may be under license from another company. Acknowledge the third party content and file a dispute. Usually, I'd select "I'm not selling the video nor making any money from it", which at the end of the day is the truth. You're doing this for fun, and it should be just for fun. Besides, I usually have custom video game music in mind when making these anyway... and the more variety I have, the better.
Well, I hope this tutorial helps. Hope to see some of you guys try out something with your favorite tracks that haven't got any love on YouTube soon. Have fun, and remember, take care of yourselves.
No comments:
Post a Comment